CHAT TO ME
MY TERMS
All of my ideas are copyrighted to me as they are my original designs. Any resemblence to any other tutorial is purely coincidental.
Do Not Translate, copy, email, download (ie; save to your own hard drive) distribute and/or make scripts/ quick guides from my tutorials.
Do Not hot link to my images or files.
Do Not upload my files to any other site. Do not share my files with others, as some of the contents require permission from thier creators to be shared.
If you are a group manager & wish to use my tutorials in your challenges, you must email me for permission BEFORE you link to my site. I reserve the right to join any group that links to my site.
VISITORS
Labels
- Awards (12)
- CT TUTORIALS (312)
- CUSTOM SERVICES (148)
- Freebies (64)
- MY TUTORIALS (299)
- PTU CU (12)
- ScrapKits (152)
- TAGS (9)
Designer Kit Preview~FREEBIE!

This is a Designer Kit Preview made by me! You flood fill each paper of your choice. All done in PNG Format and 300DPI. Perfect for any new kit. You can only get this Freebie here on my blog! Hope ya like :) Enjoy~Kelly
Download this freebie HERE
Please leave me a comment,It's always nice to get a ty!
Labels:
Freebies
|
0
comments
BLOG AWARDS!!!


I recieved these 2 awesome awards from Bev @ HorsePlaysPasture! Thanks so much hun!! XOXO
So i'm gonna pass these 2 awards on to the following ladies...
Labels:
Awards
|
0
comments
Jo's Garden
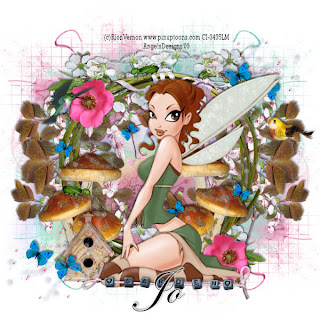 All of my tutorials require a working knowledge of PSP! This tutorial was written byme on June 19,2009. It is of my own ideas and creation! Any other tutorials found tobe similar is coincidental.
Supplies Needed
Scrapkit of Choice
I'm using a Wonderful kit called English Garden,made by Jo @ Creationz by Jo.This is a PTU kit i cannot supply. You can purchase her kit here
Tube of Choice
I'm using the Wonderful work of Rion Vernon aka PinUp Toons. You must have a license
to use hiswork! You can purchase that here
to use hiswork! You can purchase that here
Mask of Choice
Let's Begin
Open new image 600x600,Flood fill white
Copy and paste NaturalRound,Resize 40%,Image,Mirror
Add a dropshadow of choice
Copy and paste tube of choice,Resize 80%
Add a dropshadow of choice,Place in the center of the round frame
(See mine for reference)
Copy and paste blossom,Resize 30%,Add dropshadow of choice
Place at the top of the frame,behind the frame
Duplicate,Image,Mirror,Duplicate 2 more times and move down to the bottom
Copy and paste blossom bunch,Resize 30%
(see mine for placement)
Duplicate,Image,Flip
Merge the duplicated blossom bunch down onto the original
Add dropshadow of choice
Duplicate,Image,Mirror
Copy and paste paper18,resize 60%
Place this below the frame layer
Take your magic wand tool and click on the inside of the frame
(pay attention to the small parts on the frame)
Selections,Modify,Expand by 4
Selections,Invert
Highlight the paper layer,Hit delete on your keyboard
Selections,Select none
Move below all layers except the white background layer
Copy and paste paper11,Resize 70%
Apply mask of choice,Merge group on mask layer
Duplicate,Image,Mirror,image,Flip
Copy and paste paper16,Resize 70%
Do the same thing as above using the same mask
Copy and paste swirl,Resize to your liking
Add a light dropshadow of choice,Duplicate,Image,Mirror,Image,Flip
Copy and paste Toadstalls2,Resize 25%
(See mine for placement),Add dropshadow of choice
Duplicate,Image,Mirror
Copy and paste birdhouse,Resize 15%,Place at the bottom of one of the Toadstalls
Add dropshadow of choice
Copy and paste pinkflower2,Resize 30%
Place to your liking,add dropshadow,Duplicate if needed
Add any birds or butterfly's of choice,Add dropshadow
Add Your Name and CopyRight Info!
That's it,Hope you enjoyed my tutorial
Labels:
MY TUTORIALS
|
0
comments
Crime Scene
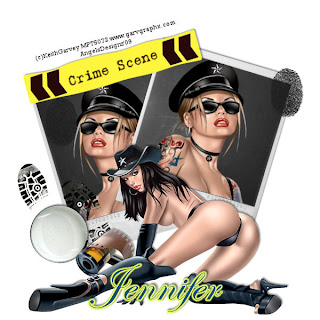 All of my tutorials require a working knowledge of PSP! This tutorial was written byme on June 19,2009. It is of my own ideas and creation! Any other tutorials found tobe similar is coincidental.
Supplies Needed
Scrapkit of Choice
I'm using a Wonderful kit called Private I,made by Jennifer @ GF Designz.This is a PTU kit i cannot supply. You can purchase her kit here
Tube of Choice
I'm using the Wonderful work of Keith Garvey. You must have a license
to use hiswork! You can purchase that here
to use hiswork! You can purchase that here
Let's Begin
Open new image 600x600,Flood fill white
Copy and paste photobk,Resize 30%
Add a dropshadow
Take your deform tool and rotate to the left a little bit
Duplicate,Image,Mirror
Copy and paste tube of choice,add dropshadow
Copy and paste magglass,Resize 20%
Add dropshadow and place to your liking
Copy and paste crime tape,Resize 10% and place on 1 of the photobk
Add dropshadow of choice
Copy and paste footprint,Resize 10%
(See mine for placement)
Copy and paste film,Resize 20%
Place by the magglass,add a dropshadow
Copy and paste a closeup tube of choice,resize to your liking
Place in the first photobk,once happy with placement
Grab your magic wand tool,click in the black part of the photobk
Selections,Invert
Highlight the closeup tube,Hit delete on your keyboard
Duplicate the closeup tube,Image,Mirror
(See mine for reference)
Copy and paste fingerprint,Resize 10%
Place on the corner of the right photobk,Duplicate a few times and place to your
liking
liking
Add Your Name and Copyright Info!
All done,Thanks for trying my tut.
Labels:
MY TUTORIALS
|
0
comments
Parental Advisory
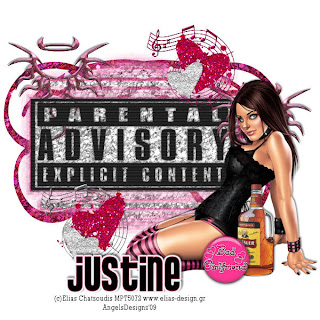 All of my tutorials require a working knowledge of PSP! This tutorial was written by
me on June 13,2009. It is of my own ideas and creation! Any other tutorials found to
be similar is coincidental.
Supplies Needed
Scrapkit of Choice
I'm using a Wonderful kit called Bad Girlfriend,made by MBJ. This is a PTU kit i
cannot supply. You can purchase her kit here
cannot supply. You can purchase her kit here
Tube of Choice
I'm using the Wonderful work of Elias Chatzoudis. You must have a license to use his
work! You can purchase that here
work! You can purchase that here
Mask of Choice
Let's Begin
Open new image 600x600,Flood fill white
Copy and paste content sign,Resize 70%
Move to the left of the canvas,See mine for reference
Copy and paste tube of choice,Resize 70%
Move to the right of canvas,Add a dropshadow of choice
Copy and paste paper5 above the white background layer,Resize 70%
Apply mask of choice,Merge group on mask layer
Copy and paste paper Glitter5,Resize 80%
Apply same mask as before,Merge group on mask layer
Merge the 2 mask layers together
Find the glittery Things,Copy and paste the pink glitter
Place below mask layer,move to the left of the canvas
Duplicate,Image,Mirror
Find the glitter hearts,Copy and paste the silver heart,Resize 20%
Place to your liking,Duplicate,Image,Mirror
Copy and paste the pink glitter heart,Resize 30%
(See mine for reference),Duplicate,Image,Mirror
Find the chrome elements,Copy and paste the pink music note element
Place behind the hearts,do the same thing for the silver one
(See mine for reference)
Find the chrome,copy and paste one of your choice
Place behind your tube,Add a dropshadow
Duplicate,Image,Mirror
Copy and paste Whiskey tube,Resize 25%,Place by your tube,add dropshadow
Copy and paste button of choice,Resize 25%
Adjust,Sharpness,Sharpen
Place by the whiskey tube
Add Your Name and CopyRight Info!
All done,Hope you enjoyed my tutorial.
Labels:
MY TUTORIALS
|
0
comments
V.I.P Only
 All of my tutorials require a working knowledge of PSP! This tutorial was written by
me on June 13,2009. It is of my own ideas and creation! Any other tutorials found to
be similar is coincidental.
Supplies Needed
Scrapkit of Choice
I'm using a Wonderful kit called Rock Me,made by MBJ. This is a PTU kit i cannot
supply. You can purchase her kit here
supply. You can purchase her kit here
Tube of Choice
I'm using the Wonderful work of Elias Chatzoudis. You must have a license to use his
work! You can purchase that here
work! You can purchase that here
Mask of Choice
Let's Begin
Open new image 600x600,Flood fill white
Look in your preset shapes and find a star of choice
Make your background color black,Draw a medium size star out(See mine for reference)
Copy and paste your tube,Resize 80%,Add a dropshadow of choice
Copy and paste license plate,Resize 30%,See mine for placement
Add dropshadow of choice
Copy and paste blue paper of choice,Resize 70%
Apply mask of choice,Merge group on mask layer
Copy and paste Red glitter paper,Apply a round mask of choice
Merge group on mask layer
Copy and paste music note necklace,Resize 40%
Place on the license plate,Grab your eraser tool,Remove the parts hanging over the
word
word
Copy and paste ticket2,Resize 30%
Grab your deform tool,rotate a little,(See mine for placement)
Copy and paste sunglasses2,Resize 30%,Place to your liking
Copy and paste a wordart of choice,Resize to your liking,add dropshadow
Copy and paste string of beads,Resize 50%
(See mine for placement),Duplicate,Image,Flip
Copy and paste mic,Resize 50%,Place under the license plate,Add dropshadow
Copy and paste Rock Button,Resize 30%
Grab your deform tool,rotate the button a bit
Adjust,Sharpness,Sharpen,Place to your liking
Add Your Name and Copyright Info!
All done,hope you liked my tutorial.
Labels:
MY TUTORIALS
|
0
comments
Paradise
 All of my tutorials require a working knowledge of PSP! This tutorial was written by
me on June 13,2009. It is of my own ideas and creation! Any other tutorials found to
be similar is coincidental.
Supplies Needed
Scrapkit of Choice
I'm using a Wonderful kit called Summer Bliss,made by Jessica @ Gothic Inspirations.
This is a PTU kit i cannot supply. You can purchase her kit here
This is a PTU kit i cannot supply. You can purchase her kit here
Tube of Choice
I'm using the Wonderful work of Elias Chatzoudis. You must have a license to use his
work! You can purchase that here
work! You can purchase that here
Mask of Choice
Let's Begin
Open new image 600x600,Flood fill white
Copy and paste tube of choice,Resize around 80%
Add a light dropshadow
Copy and paste Frame8,Resize 40%,Move to top left of tube
(See mine for reference),Duplicate,move this one to the right
Merge these 2 frames together
Copy and paste paper15,Resize 60%
Take your magic wand tool,click inside each frame
Selections,Modify,Expand by 4Selections,Invert,Highlight your paper layer
Hit delete on your keyboard,Selections,Select none
Copy and paste Palm tree2,Resize 30%,Place to your liking inside the frame
Duplicate,Image,Mirror,Move to the other frame
Copy and paste DrinkPineapple&Coconut,resize 40%
Place behind your tube,add a dropshadow of choice
Copy and paste palm,Resize 40%,Place behind the frame,paper
Duplicate,Image,Mirror,Image,Flip
Copy and paste buds,Place above the palm layer,Duplicate a few times,Place to you
liking
liking
Copy and paste plant,resize 25%,place inside your frame,Add dropshadow
Duplicate,Image,Mirror,Place to you liking
Copy and paste Manhattan drink,resize 45%,Place on the other side of your tube
Add a light dropshadow
Copy and paste the umbrella,Resize 15%,Place in the manhattan drink
Grab your deform tool and rotate the umbrella a little
Copy and paste paper2,Move below all layers but above white background
Apply mask of choice,Merge group on mask layer
Copy and paste paper6,Resize 60%
Apply same mask as before,Merge group on mask layer
Copy and paste flower2,Resize 40%,(See mine for placement)
Copy and paste butterfly of choice,Resize 15%,Place to your liking
Copy and paste bassicashell,Resize 15%,Add
down by the manhattan drink,Duplicate,Image,Mirror
Add Your Name and CopyRight Info!
All Done!! ty for trying my tut
Labels:
MY TUTORIALS
|
0
comments
Newest Blinkies 6/12/09
This blinkie was made for Nicole's friend Kara @ Kara's Designs
Check out my new blinkie i made! The kit used is called So Tweet,made by Farrah!
Thanks so much Farrah for allowing me to use your kit!! x0x0
Labels:
CUSTOM SERVICES
|
0
comments
Another New Kit~Granny's Garden
 This kit is BIG!! Everything that reminds u of granny's garden. Capture those memories using this kit,something that will last a lifetime and bring a smile to your face everytime u look at it. This kit contains:
30 Papers
18 Frames
107 Elements
All done in 300DPI and PNG Format.
This is a Tagger Size kit and Personal Use Only!!
Right now this kit is also only available @ Desired Designs n Scraps and at Dazzling Scraps,it will released at all my stores soon.
Labels:
ScrapKits
|
0
comments
New Kit~BakeArama
 Here's my newest kit out in stores. As of right now it's only available @ Desired Designs n Scraps Store and at Dazzling Scraps. This is a HUGE kit!! Sweet treats and many items that will aid u in baking the goodies u love most!
 This kit contains:
35 Papers
17 Frames
87 Elements
4 Wordart
All done in 300DPI and PNG Format.
This is a Tagger Size kit and Personal Use Only!!
I do hope to get some freebies out to u all soon.
Labels:
ScrapKits
|
0
comments
Dream Just A Little
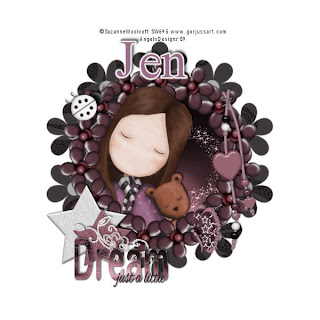 All of my tutorials require a working knowledge of PSP!This tutorial was written by meon June 1,2009. It is of my own ideas and creation! Any other tutorials found to besimilar is coincidental.
Supplies Needed
Scrapkit of Choice
I'm using a Wonderful kit called Dreamy,made by Jens Sweet Temptations. This is a PTUkit i cannot supply. You can purchase her kit here
Tube of Choice
I'm using the Wonderful work of Suzanne Woolcott. You must have a license to use herwork! You can purchase that here
Mask of Choice
Plugin-Mura Meisters-Copies Here
Let's Begin
Open new image 600x600,Flood fill white
Copy and paste flower3,Resize 20%
Effects,Plugins,Mura Meisters,Copies with these settings
Encircle
Circle
Tile Mode
Behind
Only change the Number to 15 leave the rest t default
Hit ok
Rename this layer Frame
Copy and paste paper16,Move below the frame layer
Resize 50%,Grab your magic wand tool
Click in the center of the frame,you will see marching ants
Selections,Modify,Expand by 5
Selections,Invert
Highlight the paper layer,Hit delete on your keyboard
Selections,Select none
Copy and paste tube of choice,Resize 75%
Place to your liking,Duplicate
Move original tube layer below the frame layer
Take your Eraser Tool,Remove the bottom part of your tube on the duplicated layer
On the original tube layer,Remove any parts hanging out under the frame
(See mine for reference)
Add dropshadow to both tube layers
Copy and paste paper14,Move below all layers but above white background
Apply mask of choice,Merge Group on mask layer
Copy and paste Star2,Resize 35%,Place on bottom left of frame
Copy and paste Star1,Resize 25%,Place in front of star 2
Copy and paste WA1,Resize 40%,(See mine for placement)
Copy and paste Doodle2,Resize 40%,Place behind the WA1,(See mine for reference)
Add a light Dropshadow
Copy and paste Dangle2,Resize 40%,Place on the right side of frame,Add dropshadow
Copy and paste LBug2,Resize 20%,Using your DeformTool,Rotate to your liking
Place on the top left side of frame,Add a dropshadow
Copy and paste BFly2,Resize 20%,Image,Mirror
Place to your liking,Add dropshadow
Add Your Name and CopyRight Info!
That's it,Thanks for trying my tutorial.
Labels:
MY TUTORIALS
|
0
comments
Mum's the Word
 All of my tutorials require a working knowledge of PSP!This tutorial was written by meon June 1,2009. It is of my own ideas and creation! Any other tutorials found to besimilar is coincidental.
Supplies Needed
Scrapkit of Choice
I'm using a Wonderful kit called A Mother's Love,made by A Blonde Moment. This is a
PTUkit i cannot supply. You can purchase her kit here
PTUkit i cannot supply. You can purchase her kit here
Tube of Choice
I'm using the Wonderful work of Suzanne Woolcott. You must have a license to use herwork! You can purchase that here
Mask of Choice
Let's Begin
Open new image 600x600,Flood fill white
Copy and paste tube of choice,Resize 70%
Copy and paste Frame_LightHeart,Resize 50%
Using your DeformTool,Rotate the heart to the left,(See mine for reference)Adjust,Sharpness,Sharpen
Move to the left of the canvas,Move below your tube,Merge Down onto other frame
Duplicate,Image,Mirror,Move this one down a bit
Copy and paste PaperA_Lavender below the heart frames,Resize 60%
Grab your magic wand tool,Click on the inside of both frames
Selections,Modify,Expand by 3
Selections,Invert
Highlight paper layer,Hit delete on your keyboard
Selections,Select none
Add a dropshadow to your frame layer
Copy and paste JournalPaper of choice,Resize 60%
Apply mask of choice,Merge group on mask layer
Copy and paste FlowerA_Lavender,Resize 30%
Place on your frame of the left,(See mine for reference)
Add dropshadow,Duplicate,Image,Mirror,Move into place
Copy and paste beadstring_Lavender,Resize 30%
Place on the bottom of your tube
Copy and paste FlowerB_Pink2,Resize 20%
Place on the corner of the beadstring,Add dropshadow
Duplicate,Image,Mirror
Copy and paste a WordArt of choice,Resize to your liking,Add dropshadow
Add Your Name and CopyRight Info
All done,Thanks for trying my tutorial.
Labels:
MY TUTORIALS
|
0
comments
Subscribe to:
Posts (Atom)
