


Proposal
 All of my tutorials require a working knowledge of PSP! This tutorial was written by me on December 30,2009. It is of my own ideas and creation! Any other tutorials found to be similar is coincidental.
Supplies Needed
Scrapkit of Choice
I'm using a Wonderful kit called Something Borrowed Something New,made by Gothic Inspirations. This is a PTU kit i cannot supply. You can purchase her kit here
Tube of Choice
I'm using the Wonderful work of Jose A Cano. You must have a license to use his work! You can purchase that here
Template189 by Missy @ Divine Intentionz..Thanks hun!. U can get this template HERE
Let's Begin
Blood Moon
 All of my tutorials require a working knowledge of PSP! This tutorial was written by me on December 30,2009. It is of my own ideas and creation! Any other tutorials found to be similar is coincidental.
Supplies Needed
Scrapkit of Choice
I'm using a Wonderful kit called Blood Moon Volturi,made by Gothic Inspirations. This is a PTU kit i cannot supply. You can purchase her kit here
I'm using the Wonderful work of Ted Hammond. You must have a license to use his work! You can purchase that here
Let's Begin
Newest Blinkies 12/30/09


Blog Award!

Newest Kit~My Addiction~12/21/09

Sexified

Supplies Needed
Scrapkit of Choice
Tube of Choice
Template267 made by Missy over at Divine Intentionz,Thanks hun! You can find HERE
Let's Begin
Newest Blinkies 12/17/09


So Hot

All of my tutorials require a working knowledge of PSP! This tutorial was written by me on December 16,2009. It is of my own ideas and creation! Any other tutorials found to be similar is coincidental.
Supplies Needed
Scrapkit of Choice
I'm using a Wonderful kit called Purty in Pink,made by Addicted 2 Scraps. This is a PTU kit i cannot supply. You can purchase her kit here
Tube of Choice
I'm using the Wonderful work of Ismael Rac. You must have a license to use his work! You can purchase that here
Template109 made by Kristin,Thanks hun! You can find HERE
Let's Begin
Open new image 600x600,Flood fill white
First thing we are going to do is open the template in psp
Hold down Shift+D
Delete the original copy
On the template layer,Delete the 1st and bottom layer
Click on the Pink Rectangle
Open paper26 in your psp,Click on your foreground color
When the box opens,Click on the pattern tab,Find paper26 and hit ok
Take your magic wand tool and click on the pink rectangle box
You should now have marching ants,Take your flood fill tool and fill that box
Selections,Select none
Now click on Words2 layer,Go to Adjust,Add/Remove Noise,Add Noise
Use these settings
Uniform Checked
Monochrome checked
65%
Hit ok
Do the same as above on the Swirls layer
Now CopyMerge the template and paste onto the white 600x600 canvas
Copy and paste tube of choice,Place like mine,Add dropshadow of choice
Copy and paste element 72,Resize 40%,Place at the bottom of your tube like mine
Add dropshadow of choice
Copy and paste element 42,Resize 20%,See mine for placement,Add dropshadow
Copy and paste element 41,Resize 25%,Place on top of element 42,Add dropshadow
Copy and paste element 19,Resize 40%,Place behind the template layer at the top left
Add dropshadow
Duplicate,Image,Mirror,Move this one down to the bottom right
Copy and paste element 43,Resize 25%,Place like mine and add a dropshadow
Copy and paste element 35,Resize 25%,Place on the bow at the bottom,Add light dropshadow Copy and paste element 49,Resize 15%,Image,Flip,Paste on the element 35
Now Add Your Name and CopyRight Info!!
All done.
Scrappin Bratz Sale

December 12 - December 24
Scrappin Bratz will celebrate 12 days of Christmas Savings
A different sale
Everyday.
http://www.scrappinbratz.com/shoppe
Summer Surprise

Supplies Needed
Scrapkit of Choice
I'm using a Wonderful kit called Summer Vacation,made by Gothic Inspirations. This is a PTU kit i cannot supply. You can purchase her kit here
Tube of Choice
I'm using the Wonderful work of Keith Garvey. You must have a license to use his work! You can purchase that here
Template109 You can find HERE
Let's Begin
Certified Stalker
 All of my tutorials require a working knowledge of PSP! This tutorial was written by me on December 4,2009. It is of my own ideas and creation! Any other tutorials found to be similar is coincidental.
Supplies Needed
I'm using a Wonderful kit called ORD made by Creationzbyjo. This is a PTU kit i cannot supply. You can purchase her kit here
I'm using the Wonderful work of Ismael Rac. You must have a license to use his work! You can purchase that here
Template255 You can find HERE
East Side Diva

Supplies Needed
Scrapkit of Choice
Tube of Choice
I'm using the Wonderful work of Keith Garvey. You must have a license to use his work! You can purchase that here
Let's Begin
Sk8tr Babe
 All of my tutorials require a working knowledge of PSP! This tutorial was written by me on December 4,2009. It is of my own ideas and creation! Any other tutorials found to be similar is coincidental.
Supplies Needed
Scrapkit of Choice
I'm using a Wonderful kit called Garv's Board Sk8tr,made by Missy aka ScrapsWithAttitude This is a PTU kit i cannot supply. You can purchase her kit here
Tube of Choice
I'm using the Wonderful work of Keith Garvey. You must have a license to use his work! You can purchase that here
Template You can find HERE
Let's Begin
Newest Blinkies 12/4/09


Give Thanks

All of my tutorials require a working knowledge of PSP! This tutorial was written by me on December 2,2009. It is of my own ideas and creation! Any other tutorials found to be similar is coincidental.
Supplies Needed
Scrapkit of Choice
I'm using a Wonderful kit called Traditional Thanksgiving,made by Gothic Inspirations. This is a PTU kit i cannot supply. You can purchase her kit here
Tube of Choice
I'm using the Wonderful work of Elias Chatzoudis. You must have a license to use his work! You can purchase that here
Let's Begin
Open new image 600x600,Flood fill white
Copy and paste TagbackCluster,Resize 60%,Add dropshadow
Copy and paste tube of choice,Resize 80%,Place on left side of cluster,Add dropshadow
Copy and paste Turkey1,Resize 30%,Add light dropshadow and place in front of your tube
Copy and paste Fallingleaves,Resize 30%,Place behind the turkey
Copy and paste Beads,Resize 50%,Place on the bottom of the cluster but behind your tube
Add dropshadow of choice
Copy and paste pumpkinpie,Resize 30%,See mine for placement
Add dropshadow of choice
Copy and paste CornucopiaFilled,Resize 30%,Image,Mirror
Place next to the pie,Add dropshadow
Copy and paste BasketofApples,Resize 30%,Place behind your tube,(See mine for reference)
Add a dropshadow
Copy and paste ClipWFlower,Resize 30%,Place at the top of your cluster frame
Add dropshadow
Open the Leaves in your pspImage,Flip
Copy and paste onto canvas,Resize 30%
Place under the ClipWFlower,Add dropshadow
Copy and paste JeweledFlower,Resize 20%
Place on the end of the beads,Add dropshadow
Duplicate,Image,Mirror move into place
Copy and paste Moth,Resize 20%,Place on top right corner of cluster
Duplicate,Image,Mirror
Image,Flip,See mine for placement
Copy and paste Bow2,Resize 60%,Add dropshadow
Image,Mirror,Place on right side of cluster under the moth
Copy and paste Doodle,Resize 60%,Place on the left bottom side of the cluster,Behind your cluster frame
Duplicate,Image,Mirror,Move into place,Add dropshadow to both
Copy and paste Paper4,Resize 60%,Apply mask of choice,Merge Group
Copy and paste Acorn&Leaf,Resize 40%,See mine for placement
Change the Opacity to 60%
Add Your Name and CopyRight Info now!
All done :)
Love My Hooters

Supplies Needed
Scrapkit of Choice
I'm using a Wonderful kit called Give a Hoot 4 Hooters,made by TaggingAngelsNScraps. This is a PTU kit i cannot supply. You can purchase her kit here
Tube of Choice
I'm using the Wonderful work of Elias Chatzoudis. You must have a license to use his work! You can purchase that here
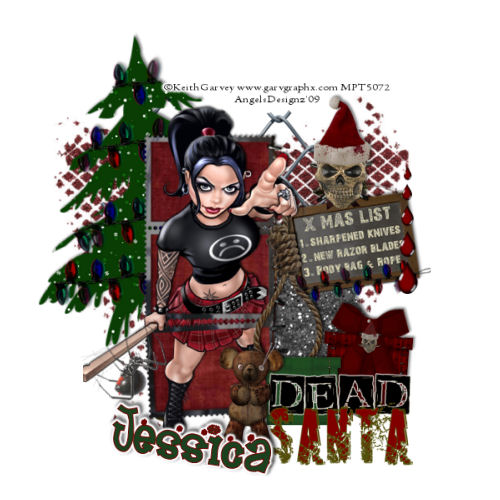
Dead Santa
All of my tutorials require a working knowledge of PSP! This tutorial was written by me on December 1,2009. It is of my own ideas and creation! Any other tutorials found to be similar is coincidental.
Supplies Needed
Scrapkit of Choice
I'm using a Wonderful kit called The Darker Side of Christmas,made by Gothic Inspirations. This is a PTU kit i cannot supply. You can purchase her kit here
Tube of Choice
I'm using the Wonderful work of Keith Garvey. You must have a license to use his work! You can purchase that here
Let's Begin
Open new image 600x600,Flood fill white
Copy and paste Frame3,Resize 60%
Copy and paste tube of choice,Move below the frame
Duplicate tube layer,Move this layer above the frame
Take your Eraser tool and remove the part of the tube in the middle and at the bottom
Add dropshadow to the top and bottom tube layer
Copy and paste paper2,Resize 60%,Move below all layers but above white background
Highlight Frame 3 layer,Take your magic wand tool,Click inside each box on frame
Selections,Modify,Expand by 3,Selections,Invert
Highlight paper2 layer,Hit delete on your keyboard,Selections,Select none
Add dropshadow of choice to your frame layer
Hide white background layer by clicking on the eye
Merge all other layers visible,Rename this layer Tube
Unhide white background layer
Resize Tube layer 80%
Copy and paste Links,Resize 60%,Place behind tube layer,Add a light dropshadow
Copy and paste Tree,Resize 60%,Place behind tube layer but above links layer,Add dropshadow
Copy and paste GlitterTree,Resize 60%,Take your Deform Tool and tilt a bit to the right
Place behind the tube layer,Add dropshadow
Copy and paste ChalkBoardWList,Resize 30%,See mine for placement,Add dropshadow
Copy and paste noose,Resize 40%,Place on the chalkboard,Use your eraser tool at the top
(See mine for reference),Add dropshadow of choice
Copy and paste Lights,Resize 40%,Place on the bottom of the chalkboard
Use your deform tool to tilt the light some
Copy and paste BackDrop,Resize 70%,Place below all layers
Use your defrom tool to squeeze it in a bit
Copy and paste present1,Resize 30%,See mine for placement,Use your deform tool and tilt it to the right
Add dropshadow of choice
Copy and paste present2,Resize 25%,Add dropshadow and place by present1
Copy and paste Wordart2,Resize 40%,Place below presents
Copy and paste DeadbearPressie,Resize 30%,Place next to wordart,add dropshadow
Copy and paste Skullinhat,Resize 30%,Place on top of chalkboard,Add dropshadow
Add Your Name and CopyRight Info now!!
That's it,Thanks for trying my tutorial:)
Holiday Wishes BLOGTRAIN

Jessica with: http://gothicinspirations.blogspot.com/
Sky with: http://skyrosemelody.blogspot.com/
Ann with: http://addicted2scrapz.blogspot.com/%22%3EAddicted
Pia with: http://digitalblueprint.blogspot.com/%22%3EDigital
Missy with: http://scrapswithattitude.blogspot.com/%22%3EScraps
Natasha with: http://stickykissesdesigns.blogspot.com/%22%3ESticky
AWARD

Now I have to tell you 10 things about myself...hmmmm lets see...
Newest Kit~Punk'd 11/24/09
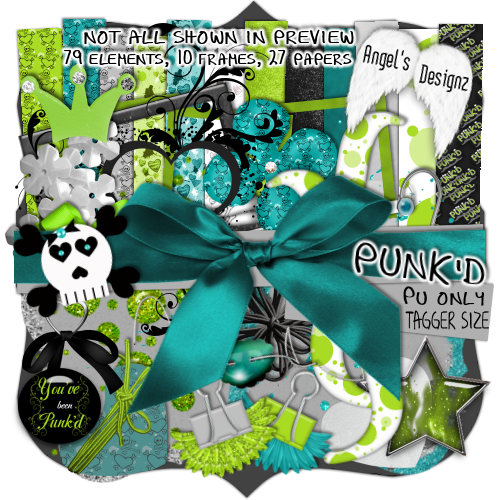 Here's my newest kit! 79 elements,10 frames and 27 papers! All done in 300 DPI and PNG format. This kit will be going into stores no later then tommorow. Hope you like.
Newest Kit!!~ Skull Addict 11/23/09
 I'm literally addicted to Skulls lol. I just can't get enough hehe. So with that being said,I have made a new kit YAY!! called Skull Addict. This is a Tagger Size kit and Personal Use Only! This kit contains 91 Elements, 16 Frames and 20 Papers. IT'S HUGE! All this for a low price of $2.50. Most of my kits are 2.50 some are a little more. But i enjoy making them so much that all my kits from now on will be 2.50 and below! Who don't love the grungy/gothic style of skulls. This kit is going up in stores today! Hope u like :)
CT CALL
 It's that time! I'm looking for a few Tutorial Writers,Tagger and Layout Makers. Click on the Tagger Kits under my labels to see my kits. I only require 2 tags/tuts or layouts a month. If interested email me @ angelbratt469@hotmail.com
Collab Kit @ Dazzling Scraps

Here's my part for the Christmas Collab over @ Dazzling Scraps. It's not available yet,but will be up soon. There's a bunch of awesome designers who have come together for this. So be sure to keep an eye out for this one exclusively @ Dazzling Scraps
♥Kelly
New Kit~Paparazzi~11/19/09
 My newest kit will be available in stores tommorow! This is a Tagger Size kit and Personal Use Only! This kit has all the glam and glitter that the paparazzi go crazy for lol. Hope u enjoy this kit,I had a blast making it!!.
 CT CALL
 Scrapper’s Secret is looking for tutorial writers, tag makers and layout makers to join our Creative Team. We have some wonderful designers with some amazing kits. If you are interested, please email Jen jennieddesigns@aol.com or Tanya scrapsbyj0eswife@gmail.com. Please put CT call in the Subject. We look forward to hearing from you!
Newest Blinkies 11/11/09


NEW KIT~Rocker Chick

Wordart Freebie PU Only!

Blinkies 11/2/09


Blondes do it BETTER!

All of my tutorials require a working knowledge of PSP! This tutorial was written by me on November 2,2009. It is of my own ideas and creation! Any other tutorials found to be similar is coincidental.
Supplies Needed
Scrapkit of Choice
I'm using a Wonderful kit called Totally Pink Satin Dreams,made by Diva Designz. This is a PTU kit i cannot supply. You can purchase her kit here
Tube of Choice
I'm using the Wonderful work of Ismael Rac. You must have a license to use his work! You can purchase that here
Animation Shop
Let's Begin
Open new image 600x600,Flood fill white
Open paper1 in your psp,Change your background color to this paper by clicking on the pattern tab
Find your paper,Change the Angle to 0 and Scale to 60,Hit ok
Change your foreground color to black
Find your Preset Rectangle tool,Change the width to 3.00
Now draw out your first rectangle,Convert to raster,See mine for reference,Duplicate,Image,Mirror
Change the scale of the paper to your choice for the next set
Keep doing the same as above only change your scale a little each time
Now on the center rectangle u drew out add a dropshadow with these settings
-2
2
56
7.00
Do this with all the ones on the left side
Then on the center one again add another dropshadow using these settings
2
-2
56
7.00
Do this for all the rectangles on the right side
Hide your white background layer by clicking on the eye in your layers section on the right
Merge all other layers visable
Unhide your white background layer
Copy and paste Tag 2,Resize 70%,Place behind the merged layer,Add dropshadow of choice
Copy and paste tube of choice,Resize 85%,Add dropshadow
Copy and paste Jewel Splatter,Resize 60%,Add dropshadow
Move towards bottom of the merged layer,(See mine for reference)
Copy and paste Bow8,Resize 30%,Add dropshadow and place on the bottom right side of merged layer
Add Your Name and CopyRight Info Now!!
Go back to the Tag2,Duplicate 2x's
Move the original one inbetween the duplicated tags
Change the names of the tags to Tag1,Tag2 and Tag3
On Tag1,Image,Rotate,Free Rotate 20.00 Right
Make sure all layers is unchecked
Move this one so the jewel at the top of the tag aligns with the others
On Tag3,Image,Rotate,Free Rotate 25.00 Left. Align the jewel with the others
Add any saying you want or the same as mine
Time to Animate!!
Now Hide Tag1 and 3
Copy Merge,Go to Animation Shop and paste as new animation
Back to PSP,Hide Tag2,Unhide Tag1
Copy Merge over to animation shop,Paste after current frame
Move the scrolly thing at the bottom over to the right
Back to PSP,Hide Tag1,Unhide Tag2
Copy Merge over to Animation Shop,Paste After Current Frame
Again move the scrolly thing at the bottom of your tag to the right
Back to psp,Hide Tag2 and Unhide Tag3
Copy Merge over to Animation Shop,Paste After Current Frame
You should have a Total of 4 Frames
Now check your Animation
Highlight first frame,Go to Animation,Frame Properties and change to 25
Do this for each frame,Check animation again
Once happy with animation,Save as a GIF.
All done,Hope i didn't lose you anywhere on the animation
Thanks for trying my tutorial!
Phunk-i-Licous
 All of my tutorials require a working knowledge of PSP! This tutorial was written by me on November 1,2009. It is of my own ideas and creation! Any other tutorials found to be similar is coincidental.
Supplies Needed
Scrapkit of Choice
Tube of Choice
Let's Begin
Autumn Blessings Blogtrain has Arrived!

NEW KIT~Haunted Memories
 This kit has 67 Elements,5 Frames and 20 Papers! Along with 2 wordart. This kit is not yet uploaded to stores. Will be avilable in most stores on Nov. 15th! Along with my kit going into stores on the november 15th i will also have a small freebie that will be posted here on my blog for 1 week!! The freebie goes with my kit,Not all items were used but who don't love a freebie that is CU ok! Hope you like the new kit and CU freebie,It was a blast making it!!
 Reflections

Supplies Needed
Scrapkit of Choice
Tube of Choice
Let's Begin
Darkness
 All of my tutorials require a working knowledge of PSP! This tutorial was written by me on October 27,2009. It is of my own ideas and creation! Any other tutorials found to be similar is coincidental.
Supplies Needed
Tube of Choice
Let's Begin
Change of the Seasons
 All of my tutorials require a working knowledge of PSP! This tutorial was written by me on October 21,2009. It is of my own ideas and creation! Any other tutorials found to be similar is coincidental.
Supplies Needed
Scrapkit of Choice
Tube of Choice
Let's Begin


