CHAT TO ME
MY TERMS
All of my ideas are copyrighted to me as they are my original designs. Any resemblence to any other tutorial is purely coincidental.
Do Not Translate, copy, email, download (ie; save to your own hard drive) distribute and/or make scripts/ quick guides from my tutorials.
Do Not hot link to my images or files.
Do Not upload my files to any other site. Do not share my files with others, as some of the contents require permission from thier creators to be shared.
If you are a group manager & wish to use my tutorials in your challenges, you must email me for permission BEFORE you link to my site. I reserve the right to join any group that links to my site.
VISITORS
Labels
- Awards (12)
- CT TUTORIALS (312)
- CUSTOM SERVICES (148)
- Freebies (64)
- MY TUTORIALS (299)
- PTU CU (12)
- ScrapKits (152)
- TAGS (9)
Blog Archive
- 2012 (60)
-
2011
(308)
- December(19)
- November(18)
- October(9)
- September(24)
- August(11)
- July(11)
- June(23)
- May(36)
- April(35)
-
March(28)
- NEW! CU Skull Templates
- NEW BLINKIES 3-3-2011
- Sarah created this awesome tag/tut using my newes...
- Marie created this aweosome tag/tut using my newes...
- Terily created this wicked tag using my Wicked In ...
- Easter Punk 3-22-2011
- Emo Qt
- Sarah created this sexy tag using my Cherry Bomb ...
- Cherry Pie
- Award!!
- NEW BLINKIES_3-19-2011
- Tiffany created this awesome tag/tut using my Luc...
- New Collab Exclusively @ DigiFoxsStudio
- NEW KIT_Cherry Bomb
- Crystal created this beautiful tag/tut using my ki...
- Purple created this sexy tag/tut using my Sarahli...
- Brooke created this awesome tag/tut using my kit ...
- No title
- Sarah created this lovely tag/tut using my Brayli...
- Avatar
- Wild Thing
- Paris
- NEW KIT_Devilish Tease
- New Kit and CU Item in stores
- New Kit_Lucky Charm
- SNEAK PEAK KIT!
- NEW BLINKIES_3-6-2011
- Gothic Inspirations_Spring Break Blogtrain
- February(41)
- January(53)
- 2010 (375)
- 2009 (333)
- 2008 (13)
 Sarah created this awesome tag/tut using my newest kit Easter Punk. U cand find the tutorial on her blog HERE
Labels:
CT TUTORIALS
|
0
comments

Terily created this wicked tag using my Wicked In Teal kit. U can find the tutorial for this tag HERE
Thanks hun,Love it!
Labels:
CT TUTORIALS
|
0
comments
Emo Qt

Sarah created this AWESOME tag/tut using my part of the Emo Qt collab i have w/ Foxys Designz. Check out her blog for the tutorial HERE
Thanks hunni bunni,I Love it!♥
Labels:
CT TUTORIALS
|
0
comments
 Sarah created this sexy tag using my Cherry Bomb kit. Check out her blog for even more HERE
Thanks hunni bunni,I love it!
Labels:
CT TUTORIALS
|
0
comments
Cherry Pie
 Shal created this awesome tag/tut using my newest kit~Cherry Bomb. Check out her blog to find the tutorial for this tag HERE
Thanks hun, Love it!
Labels:
CT TUTORIALS
|
0
comments
Award!!
 The aim of the award is to bring recognition to blogs with minimal followers. Since I have accepted the award I must pass it on to at least 3 other blogs (but not more than 5), that have inspired me and I feel deserve a bit more attention. The rules are to say thank you on my blog to the one who passed it on to me (Thank you Stef!!! Love this) and link to their blog HERE. Pick the blogs to pass the award on to, leave a note on their blog and then list them with links to their blogs...
The blogs I've chosen are:
 Tiffany created this awesome tag/tut using my Lucky Charm kit. U can find the tutorial on her blog HERE
Thanks hun,Love it!
Labels:
CT TUTORIALS
|
0
comments

Crystal created this beautiful tag/tut using my kit My Little Ladybug. U can find this on her site HERE
Thanks hun,Love It!!
Labels:
CT TUTORIALS
|
0
comments
 Purple created this sexy tag/tut using my Sarahlicious kit. U can find the tutorial on her blog HERE
Thanks hun,Love it!
Labels:
CT TUTORIALS
|
0
comments
 Brooke created this awesome tag/tut using my kit My Little Ladybug. Check out her blog for the tutorial HERE
Thanks hun,Love it!
Labels:
CT TUTORIALS
|
0
comments


 Tanya created these Layouts using my Birthday Bash Kit. U can check out her blog for more awesome layouts HERE
Labels:
CT TUTORIALS
|
0
comments
 Sarah created this lovely tag/tut using my Braylin Kit. U can find the tutorial to this tag on her blog HERE
Thanks hun,Love it!
Labels:
CT TUTORIALS
|
0
comments
Avatar
Supplies Needed
Scrapkit of Choice
I'm using a Wonderful kit called I See You,made by Bello Scarto. This is a PTU kit that is cannot supply. You can grab this awesome kit here
Tube of Choice
I'm using the Wonderful work of Eugene Rzhevskii. You must have a license to use his work! You can purchase that here
Let's Begin
Open new image 600x600.
Copy and paste element44,Resize 75%.
Copy and paste Tube of choice,Resize to your liking.
Place in frame.
Copy and paste paper8,Resize 65%.
Move below tube layer.
Take your Magic Wand tool and click on the inside of the frame.
Selections,Modify,Expand by 4.
Selections,Invert.
Now highlight the paper layer and hit delete on your keyboard.
Highlight the tube layer and hit delete on your keyboard.
Selections,Select none.
Add dropshadow to your tube layer.
Merge the frame,tube,paper together.
Image,Mirror,Add dropshadow to the frame layer.
Copy and paste tube of choice,again resize to your liking,Add dropshadow.
Copy and paste element42,Resize 65%,Place behind your tube like mine,Add dropshadow.
Copy and paste element32,Image,Flip.
Place on top of the frame,Take your deform tool and squeeze the element in a little bit.
Add a dropshadow of choice.
Copy and paste element11,Resize 45%,Place on top of element32,Add dropshadow.
Copy and paste element39,Resize 45%,Place behind your tube like mine,add dropshadow.
Copy and paste element31,Reszie around 55%.
Add dropshadow and duplicate 3x's and then move into place.
Copy and paste 32,Resize 65%,Image,Mirror.
Add dropshadow and place on the bottom of element31.
Copy and paste element10,Resize to your liking,Place like mine and add a dropshadow.
Copy and paste element17,Resize again to your liking,place like mine and add a dropshadow.
Copy and paste element24,Resize to your liking.
Image,Mirror.
Place on element17 and add a dropshadow.
Copy and paste element22,Resize 45%,See mine for placement and add a dropshadow.
Copy and paste element30,Resize 65%,Place behind element22,Add dropshadow.
Copy and paste Medi_Essence,Resize around 35%.
Place to your liking and duplicate,move this one to another spot.
Add dropshadow to both.
Copy and paste paper12,Apply mask of choice.
Merge group on mask layer.
Copy and paste paper3,Apply same mask as before.
Merge group on mask layer.
Image,Mirror,Move into place.
Now add your name and copyright info.
Save as a PNG,all done.
Labels:
MY TUTORIALS
|
0
comments
Wild Thing
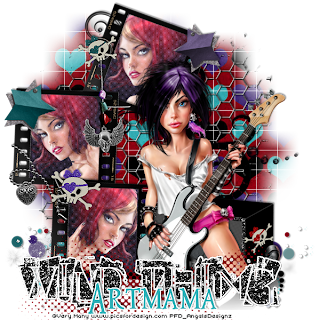
All of my tutorials require a working knowledge of PSP! This tutorial was written by me on March 13,2011. It is of my own ideas and creation! Any other tutorials found to be similar is coincidental.
Supplies Needed
Scrapkit of Choice
I'm using a Wonderful kit called Wild Thing made by Artmama Made. This is a PTU kit that is cannot supply. You can grab this awesome kit here
Tube of Choice
I'm using the Wonderful work of Very Many. You must have a license to use her work! You can purchase that here
Let's Begin
Open new image 600x600.
Open embellie25 in your psp.
Image,Rotate,Rotate Clockwise.
Copy and paste onto your canvas.
Copy and paste Paper05,Resize 65%.
Place below the frame layer.
Highlight the frame layer,Take your magic wand tool and click inside each part of the frame.
Selections,Modify,Expand by 2.
Selections,Invert.
Highlight the paper layer and hit delete on your keyboard.
Selections,Select none.
Now choose a tube of choice,Resize around 75%.
Place in frame like mine.
Once happy with placement,Click on the frame layer using your magic wand tool.
Selections,Modify,Expand by 2.
Selections,Invert.
Highlight the tube,hit delete on your keyboard.
Selections,Select none.
Do the same for the other 2 parts of the frame.
Double click on each tube layer,Change the Blend Mode to Screen.
Copy and paste embellie62,Resize to your liking,Place behind the paper layer.
Add dropshadow of choice.
Copy and paste another tube of choice,Resize around 85%,Add dropshadow.
Copy and paste embellie50,Resize 65%,Place behind your tube like mine.
Add dropshadow of choice.
Copy and paste embellie24,Resize 65%,Place above the embellie62,Add dropshadow of choice.
Copy and paste embellie21,Resize to your liking,Place behind tube a speaker.
Add a light dropshadow of choice.
Copy and paste embellie29,Resize 45%,Place on the frame like mine,Add light dropshadow.
Copy and paste embellie14,Resize to your liking place on the top frame.
Copy and paste embellie56,Resize 30%,Place on the ring of embellie14.
Image,Rotate,Free Rotate,18.00,Right.
Copy and paste embellie55,Resize 35%.
Image,Rotate,Free Rotate,18.00,Left.
Copy and paste embellie 57,Resize 45%,Place on the middle frame.
Add dropshadow of choice.
Copy and paste embellie56,Resize 35%,Place on top frame above your tube.
Add dropshadow of choice.
Copy and paste paper09,Apply mask of choice.
Merge Group on mask layer.
Copy and paste embellie34,Place at the bottom of the tag.
Add Your Name and CopyRight Info.
Save as a PNG. and your done.
Labels:
MY TUTORIALS
|
0
comments
Paris
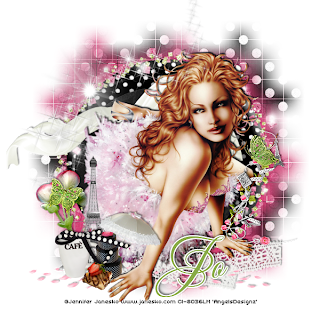
All of my tutorials require a working knowledge of PSP! This tutorial was written by me on March 13,2011. It is of my own ideas and creation! Any other tutorials found to be similar is coincidental.
Supplies Needed
Scrapkit of Choice
I'm using a Wonderful kit called Paris made by A Taggers Scrap. This is a PTU kit that is cannot supply. You can grab this awesome kit here
Tube of Choice
I'm using the Wonderful work of Jennifer Janesko. You must have a license to use her work! You can purchase that here
Let's Begin
Open new image 600x600.
Copy and paste Frame2,Resize around 85%.
Copy and paste Frame3a,Resize around 75-80%.
Apply light dropshadow to both.
Copy and paste Paper of choice,Resize 65%.
Place below frame2.
Take your Magic wand tool and click inside frame2.
Selections,Modify,Expand by 4.
Selections Invert.
Highlight paper of choice,and hit delete on your keyboard.
Selections,Select none.
Copy and paste Tube of choice,Resize to your liking,Add light dropshadow.
Copy and paste CurtainSwirl2,Resize to your liking.
Place behind your tube.
Duplicate,Move the original below frame2.
Take your Eraser Tool and remove the parts of the curtain hanging over the left side of the frame.
Add light dropshadow to the duplicated layer of the curtainswirl.
Copy and paste deco,Resize around 65%,Image,Mirror.
Place on the right side of the tag like mine.
Adjust,Sharpness,Sharpen.
Add dropshadow of choice.
Copy and paste butterfly2,Resize around 30%,Place to your liking.
Adjust,Sharpness,Sharpen.
Add light dropshadow.
Copy and paste Flower2,Resize around 45%.
Place on the left side of the frame,Add light dropshadow.
Image,Rotate,Free Rotate,20.00,Left.
Adjust,Sharpness,Sharpen.
Add light dropshadow.
Copy and paste Eiffeltower,Resize around 45-50%,Place like mine.
Copy and paste mug,Resize 20%,Place like mine,Add light dropshadow.
Copy and paste hatboxes,Resize 25%,Place by the mug,add light dropshadow.
Copy and paste Pastry,Resize around 35%,Place in front on the mug,add light dropshadow.
Copy and paste Umbrella,Resize around 30%,Place behind the hatboxes like mine,add dropshadow.
Copy and paste Butterfly,Resize 30%.
Image,Rotate,Free Rotate,20.00.
Right.Adjust,Sharpness,Sharpen.
Place on flower,Add dropshadow of choice.
Open Lace in your psp.Image,Rotate,Rotate Counter Clockwise.
Copy and paste lace,Move to the bottom of your tag like mine,Add dropshadow.
Copy and paste Petals,Place at the bottom of your tag,Resize around 45%.
Use your eraser tool to remove any petals covering your tubes hand.
Add dropshadow of choice.
Duplicate the petals,Image,Mirror.
Copy and paste Lights,Resize to your liking.
Place lights at the top of your tag,Add light dropshadow.
Copy and paste Bow,Resize 20-25%,Place on the mug like mine,Add dropshadow of choice.
Copy and paste Paper24 below all layers.
Apply mask of choice,Merge group on mask layer.
Copy and paste paper27,Apply same mask as before.
Image,Mirror.,Merge group on mask layer.
Move paper27 below paper24.
Now Add your Name and Copyright Info!!
Save as a PNG,All done.
Labels:
MY TUTORIALS
|
0
comments
Gothic Inspirations_Spring Break Blogtrain
 The Gothic Inspirations Blogtrain has left the station. Be sure to check out each link below as each designer has contributed a awesome part as well. If u don't see their part up please check back as we are all on different time zones. Also be sure to leave a little Thank You apon downloading from each designer.
I have created 6 Commercial Use Frames for you as my part of the train. U can grab them HERE
~Enjoy~♥Kelly
Follow the rest of the train below!
Annette with: AW Designs
Jo with: A Taggers Scrap
Angel with: Angel Flower Scraps
Kelly with: Angels Designz
Lisa with: Arty-Pharty
Deanna with: Butterfly Kisses Scraps
Jill with: Created By Jill Scraps
Stuart with: Creative Crazy Scraps
Muriel with: Creative-Disorder
Dani with: Darkmoon's Dream
Sarah with: Designs By Sarah
SharonB with: Designs By SharonB
Dianna with: Digicats (& Dogs)
Pia with: Digital Blue Print
Conchi with: DNScraps
Vicki with: Gemini Creationz
Julie with: Glitter Girls
Jessica with: Gothic Inspirations
Hezalin with: HezaScraps & Tags
Victoria with: Maitri Scraps
Edna with: Miss Edna
T.J. with: Moody Designz
Sally with: Mythical Designs
NAC with: Naughty Angels Creations
Nette with: Nette's NightOwl Works
Rieka with: Rieka Rafita
Kimberly with: Scrap Rebellion
Marie with: SkyScraps
Kara with: Sweet Cravings Scraps
Tyger with: Tyger's Tidbits
Edna with: Vermont Angel Eyes
Julie with: Whispy's D'zines
Labels:
Freebies
|
5
comments
Subscribe to:
Posts (Atom)
Blog Archive
-
▼
2011
(308)
-
▼
March
(28)
- NEW! CU Skull Templates
- NEW BLINKIES 3-3-2011
- Sarah created this awesome tag/tut using my newes...
- Marie created this aweosome tag/tut using my newes...
- Terily created this wicked tag using my Wicked In ...
- Easter Punk 3-22-2011
- Emo Qt
- Sarah created this sexy tag using my Cherry Bomb ...
- Cherry Pie
- Award!!
- NEW BLINKIES_3-19-2011
- Tiffany created this awesome tag/tut using my Luc...
- New Collab Exclusively @ DigiFoxsStudio
- NEW KIT_Cherry Bomb
- Crystal created this beautiful tag/tut using my ki...
- Purple created this sexy tag/tut using my Sarahli...
- Brooke created this awesome tag/tut using my kit ...
- No title
- Sarah created this lovely tag/tut using my Brayli...
- Avatar
- Wild Thing
- Paris
- NEW KIT_Devilish Tease
- New Kit and CU Item in stores
- New Kit_Lucky Charm
- SNEAK PEAK KIT!
- NEW BLINKIES_3-6-2011
- Gothic Inspirations_Spring Break Blogtrain
-
▼
March
(28)
