CHAT TO ME
MY TERMS
All of my ideas are copyrighted to me as they are my original designs. Any resemblence to any other tutorial is purely coincidental.
Do Not Translate, copy, email, download (ie; save to your own hard drive) distribute and/or make scripts/ quick guides from my tutorials.
Do Not hot link to my images or files.
Do Not upload my files to any other site. Do not share my files with others, as some of the contents require permission from thier creators to be shared.
If you are a group manager & wish to use my tutorials in your challenges, you must email me for permission BEFORE you link to my site. I reserve the right to join any group that links to my site.
VISITORS
Labels
- Awards (12)
- CT TUTORIALS (312)
- CUSTOM SERVICES (148)
- Freebies (64)
- MY TUTORIALS (299)
- PTU CU (12)
- ScrapKits (152)
- TAGS (9)
Blog Archive
Dragon Tales
All of my tutorials require a working knowledge of PSP! This tutorial was written
by me on August 14,2009. It is of my own ideas and creation! Any other tutorials
found to be similar is coincidental.
by me on August 14,2009. It is of my own ideas and creation! Any other tutorials
found to be similar is coincidental.
Supplies Needed
Scrapkit of Choice
I'm using a Wonderful kit called Once Upon a Time,made by Twinky Dezines. This isa PTU kit i cannot supply. You can purchase her kit here
Tube of Choice
I'm using the Wonderful work of Suzanne Woolcott. You must have a licenseto use her work! You can purchase that here
Animation Shop
Let's Begin
Open new image 550x175,Flood fill white
Copy and paste paper14
Copy and paste castle,leave like it is,Add a dropshadow to it
Copy and paste Heart1,Resize to your liking
Paste on the window on the right side of the tag,(See mine for reference)Duplicate,Image,Mirror
Copy and paste swirl,Resize to your liking,place on the hearts
Copy and paste tube of choice,Resize to your liking,Add dropshadow
Find the dragon,Image,Mirror
Copy and paste dragon,Resize to your liking,Add dropshadow
Add Your Name and Copyright Info now!!
:Time to Animate:
Hide the dragon layer by clicking on the eye in the layers palette on the right
Copy Merge tag over to Animation Shop
Paste as new animationBack to Psp
Move the dragon down so only the head shows
Copy merge tag over to animation shop
Paste after current frame
Back to Psp
Move the dragon straight up to the waist of the dragon
Copy Merge over to animation shop
Paste after current frame
Back to Psp
Move the dragon straight up to where the feet show on the tag
Copy Merge over to animation shop
Back to Psp
Hit undo in PSP,(The dragon will go down)
Copy Merge over to animation shop
Paste after current frame
Do this 2 more times
Highlight the 1st layer,Animation-change frame properties to 15
Go to the next layer,change the frame properties to 20
Change the frame properties to 20 for the next to layers
Change the frame layer where it shows the whole dragon to 125
Change the next 3 frame properties to 20
Check your animation by clicking on the 2nd button from the right in animation shop
Once happy with animation,Save as a gif.
That's it,hope you enjoyed my tutorial.
Labels:
MY TUTORIALS
|
0
comments
Pixie
All of my tutorials require a working knowledge of PSP! This tutorial was written byme on August 14,2009. It is of my own ideas and creation! Any other tutorialsfound to be similar is coincidental.
Supplies Needed
Scrapkit of Choice
I'm using a Wonderful kit called Poison,made by Bea Creation's. This isa PTU kit i cannot supply. You can purchase her kit here
Tube of Choice
I'm using the Wonderful work of Elias Chatzoudis. You must have a license to use his work! You can purchase that here
Bling HERE
Plugins-AAA Frame-foto frame
Animation Shop
Let's Begin
Open new image 550x175,Flood fill white
Copy and paste paper p3,Resize 80%
Copy and paste paper p12,Resize 80%
Take your selection tool,Draw out a square not to small
Selections,Invert and on p12 layer hit delete
Copy and paste deco7,Resize 70 or 80%
Copy and paste glitter4,Resize 70%,Place in center of tag
Copy and paste glitter2,Resize 70%,Place on top of glitter4
Copy and paste tube of choice,Resize 80%,Place in center like mine
Add a dropshadow of choice
Copy and paste deco5,Resize 70%,Place on right side of canvas
Duplicate,Image Mirror,Add a dropshadow to both
Copy and paste flower12,Resize 30% or to your liking
(See mine for placement),Duplicate,Image,Mirror
Merge these layers visable
Now go to Effects,Plugins,AAA Frame-Foto Frame
Change the width to 5,leave the rest the same
Add Your Name and Copyright info!!
:Time to Animate:
Copy Merge your tag over to Animation Shop
Hold down ctrl and hit L till you get 20 frames on your tag
Edit,Select all
Open the bling i have provided for you
Delete the first layer on the bling,(the black layer)
Edit,Select all
Edit,Copy
Highlight your tag layer,Edit,Paste Into selected frame
Place bling to your liking
Once happy with placement,Check animation by clicking on the 2nd button from the topright,Save as a gif.
Hope you enjoyed my tutorial
Labels:
MY TUTORIALS
|
0
comments
Rockin To The Beat
All of my tutorials require a working knowledge of PSP! This tutorial was written byme on August 11,2009. It is of my own ideas and creation! Any other tutorialsfound to be similar is coincidental.
Supplies Needed
Scrapkit of Choice
I'm using a Wonderful kit called Rockin Attitude,made by ScrapsWithAttitude. This is
a PTU kit i cannot supply. You can purchase her kit here
a PTU kit i cannot supply. You can purchase her kit here
Tube of Choice
I'm using the Wonderful work of Keith Garvey. You must have a license
to use his work! You can purchase that here
to use his work! You can purchase that here
Bling HERE
Plugins-AAA Frame-foto frame
Animation Shop
Let's Begin
Open new image 550x175,Flood fill white
Copy and paste paper5,Resize 70%
Copy and paste a closeup tube of choice,Resize 50%
Add a light dropshadow,change the color of the shadow to white
Copy and paste bass guitar1,Resize 10%
Take your deform tool and rotate to the left a bit
Copy and paste bass guitar2,Resize 10%,Place by the other one
Copy and paste Amp1,Resize 10%,Place behind the guitars
Copy and paste button2,Resize 30% or to your liking,Place in the center of tag
(See mine for reference on placement)
Copy and paste Mic2,Resize 10%,(See mine for placement),Add black dropshadow
Copy and paste music note3,Resize 10%,Place to your liking,Add a white dropshadow
Copy and paste music note4,Resize 10%,Place to your liking,Add a white dropshadow
Copy and paste bow4,Resize 25%,see mine for placement,Add a white dropshadow
Merge all layers visable
Effects,Plugins,AAA Frame,foto frame
Change the width to 8 leave everything else the same
Add your name and copyright info now!!
:Time to Animate:
Copy Merge your tag over to Animation Shop
Hold down ctrl and hit L till you get 21 frames on your tag
Edit,Select all
Open the bling i have provided for you
Delete the first layer on the bling,(the black layer)
Animation,Rotate 90,right
Edit,Select all
Edit,Copy
Highlight your tag layer,Edit,Paste Into selected frame
Place bling to your liking
Once happy with placement,Check animation by clicking on the 2nd button from the top
right,Save as a gif.
right,Save as a gif.
Hope you enjoyed my tutorial
Labels:
MY TUTORIALS
|
0
comments
Star Struck
All of my tutorials require a working knowledge of PSP! This tutorial was written byme on August 11,2009. It is of my own ideas and creation! Any other tutorialsfound to be similar is coincidental.
Supplies Needed
Scrapkit of Choice
I'm using a Wonderful kit called Black & White Collection:Blue,made by Rieneke
Designs. This is a PTU kit i cannot supply. You can purchase her kit here
Designs. This is a PTU kit i cannot supply. You can purchase her kit here
Tube of Choice
I'm using the Wonderful work of Keith Garvey. You must have a license
to use his work! You can purchase that here
to use his work! You can purchase that here
Bling HERE
Animation Shop
Let's Begin
Open new image 550x175,Flood fill white
Copy and paste paper5,Resize 70%
Copy and paste a closeup tube of choice,Resize 55%
Add a light dropshadow,change the color of the shadow to black
Copy and paste wire3,Resize 50%,Place like mine
Copy and paste ricrac2,Resize 50%,Place on the bottom of tag
Duplicate Image,Flip. Duplicate again and pull over to right so you can see it on
the other side of your closeup tube,(See mine for reference)
the other side of your closeup tube,(See mine for reference)
Copy and paste glitterstars1,Resize 30%,Place on the left side of tag under ricracs
Duplicate,Image,Mirror,Move to the left a little
Copy and paste heartribbon1,Resize 60%,Place at bottom of tag,Add dropshadow
Add any extra elements of choice
Copy and paste bf1,Resize 30%,Place by closeup tube
Add dropshadow,Duplicate,Image,Mirror,See mine for placement
Add your name and copyright info now!
:Time to Animate:
Copy Merge your tag over to Animation Shop
Hold down ctrl and hit L till you get 21 frames on your tag
Edit,Select all
Open the bling i have provided for you
Delete the first layer on the bling,(the black layer)
Animation,Rotate 90,right
Edit,Select all
Edit,Copy
Highlight your tag layer,Edit,Paste Into selected frame
Place bling to your liking
Once happy with placement,Check animation by clicking on the 2nd button from the top
right,Save as a gif.
right,Save as a gif.
Hope you enjoyed my tutorial
Labels:
MY TUTORIALS
|
0
comments
Glamorous
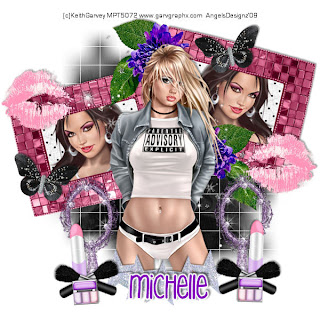 All of my tutorials require a working knowledge of PSP! This tutorial was written by
me on August 11,2009. It is of my own ideas and creation! Any other tutorials
foundto be similar is coincidental.
Supplies Needed
Scrapkit of Choice
I'm using a Wonderful kit called Glamorous,made by Candy Kisses Designz. This is a PTU kit i cannot supply. You can purchase her kit here
Tube of Choice
I'm using the Wonderful work of Keith Garvey. You must have a license to usehis
work! You can purchase that here
work! You can purchase that here
Mask of Choice
Let's Begin
Open new image 600x600,Flood fill white
Copy and paste tube of choice,Resize to your liking
Copy and paste Frame_4,Resize 70 or 80%,See mine for placement
Copy and paste paper8,Resize 70%
Copy and paste a closeup tube,Resize to your liking,Place inside frame
Highlight frame layer,Take your magic wand tool,click inside frame
Selections,Modify,Expand by 5
Selections,Invert
Highlight paper8 layer and hit delete on your keyboard
Highlight closeup tube of choice,Hit delete on your keyboard
Selections,Select none
Add a dropshadow to the closeup tube
Merge the closeup tube,paper8,frame_4 together,Resize once merged 80%Duplicate,Image,Mirror,See mine for placementCopy and paste paper12 below all layers but above white background layer
Resize 70%,Apply mask of choice,Merge group on mask layer
Copy and paste Sparkle,Resize 80%,place in the middle of the 2 frames,behind the
main tube
main tube
Copy and paste lips,Resize 80%,Place on bottom corner of the right frame
Duplicate,Image,Mirror,Place like mine
Copy and paste butterfly2,Resize 40%,Place on top right frame
Duplicate,Image,Mirror,See mine for placement
Copy and paste Star,Resize 40%,Place at the bottom of your tube
Duplicate,Image mirror a few times,See mine for reference
Copy and paste makeup brush,Place to your liking,Duplicate,Image,Mirror
Copy and paste leaves2,Resize 60%,See mine for placement
Duplicate,Image,Mirror,Place like mine,Add dropshadow to both
Copy and paste flower3,Resize 40%,Place on the green leaves
Duplicate,Image,Mirror,Move over to the other set of green leaves
Add any extra elements of your choice
Apply Your name and CopyRight Info now!
That's it,Hope you enjoyed my tutorial.
Labels:
MY TUTORIALS
|
0
comments
Glamorous Banner
All of my tutorials require a working knowledge of PSP! This tutorial was written by
me on August 11,2009. It is of my own ideas and creation! Any other tutorials
foundto be similar is coincidental.
me on August 11,2009. It is of my own ideas and creation! Any other tutorials
foundto be similar is coincidental.
Supplies Needed
Scrapkit of Choice
I'm using a Wonderful kit called Glamorous,made by Candy Kisses Designz. This is a PTU kit i cannot supply. You can purchase her kit here
Tube of ChoiceI'm using the Wonderful work of Keith Garvey. You must have a license to usehis
work! You can purchase that here
Plugins-AAA Frames-Foto Frame
Bling HERE
Animation Shop
Let's Begin
Open new image 550x175,Flood fill white
Copy and paste paper6,Resize 70%
Copy and paste a closeup tube of choice,Resize 55%
Add a light dropshadow,change the color of the shadow to white
Copy and paste sparkle,Place on right side of canvas,Resize to your liking
Duplicate,Image,Mirror,Image,Flip,Place to your liking
Copy and paste ribbon2,below the sparkles and tube layer
Duplicate a few times but move the ribbon in each time,(See mine for reference)
Copy and paste ribbon3,Resize 70%,Place on top of each pink ribbon
(See mine for placement)
Copy and paste butterfly1,Resize 30%,Add dropshadow
Take your deform tool and rotate to the left,Adjust,Sharpness,Sharpen
Place down at the bottom of canvas like mine
Copy and paste flower,Resize 50%
Place below all layers but above white background and black paper
Duplicate 3 times,(See mine for placement)
Copy and paste leaves1,Resize 50%,Place under the flower on the right
Duplicate 3 times,and move under other flowers,(See mine for reference)
Merge all layers visable
Effects,Plugins,look for AAA Frames-Foto Frame,Change the width to 5
Add Your Name and Copy Right now!
:Animation Time:
Open the bling i attached in Animation shop
Copy Merge your tag over to Animation Shop
Now the bling has 21 frames,so you have to add frames to your tag
Hold down the ctrl button and hit L until you have 21 frames on your tag
Edit,select all
Highlight your bling layer,Animation Rotate,90,Right
Edit,Select all
Edit,Copy
Highlight your tag layer,Edit,Paste into selection,(Place to your liking on tag)
Check your animation by clicking on the 2nd button from right
Once happy with everything,save as a gif.
Hope your enjoyed my tutorial!
Labels:
MY TUTORIALS
|
0
comments
Back To School Collab

Here's my part for the Back to School Collab that you can find only @ Paradise4Scrappers. Not yet in stores. There's a bunch of awesome designers who have contributed to this collab. Check out mine and so many more HERE
Labels:
ScrapKits
|
1 comments
Awesome Sales!
 Check out this awesome sale @ digi-shoppe. Lot's of awesome designers including myself lol. Lot's of discounts on some fabulous scrapkits. Check it out HERE
Subscribe to:
Posts (Atom)
