CHAT TO ME
MY TERMS
All of my ideas are copyrighted to me as they are my original designs. Any resemblence to any other tutorial is purely coincidental.
Do Not Translate, copy, email, download (ie; save to your own hard drive) distribute and/or make scripts/ quick guides from my tutorials.
Do Not hot link to my images or files.
Do Not upload my files to any other site. Do not share my files with others, as some of the contents require permission from thier creators to be shared.
If you are a group manager & wish to use my tutorials in your challenges, you must email me for permission BEFORE you link to my site. I reserve the right to join any group that links to my site.
VISITORS
Labels
- Awards (12)
- CT TUTORIALS (312)
- CUSTOM SERVICES (148)
- Freebies (64)
- MY TUTORIALS (299)
- PTU CU (12)
- ScrapKits (152)
- TAGS (9)
Blog Archive
- 2012 (60)
- 2011 (308)
- 2010 (375)
-
2009
(333)
- December(17)
- November(15)
- October(18)
- September(5)
- August(10)
- July(25)
- June(15)
- May(18)
- April(30)
- March(54)
- February(51)
-
January(75)
- Flower Garden
- Valentine Sweetheart
- Orange Crush
- Letters From Iraq
- Someone I ♥ has Lupus
- Hope
- Lil Birdie's
- Another New Blinkie 1/29/09
- Newest Blinkie 1/29/09
- WildLife-Friends
- Jeans Kinda Girl
- Love You-Valentine
- Passion
- Goth Love
- Kiss This
- Girlz Rule
- Pirate Chick
- Addicted
- Pot of Gold
- Country Hollow Scraps Store
- British Pride
- Love Notes
- Sexy Valentine
- S♥W♥A♥K
- Newest Blinkie Made 1/23/09
- Bright & Beautiful
- Newest Blinkies Made Today! 1/22/09
- CT Call!
- Farrah's having a SALE!!!!
- Newest Blinkie I Made 1/21/09
- Envy Me
- Arizona Cardinals
- el-e-gance
- Go Team
- Guardian Angel
- Always & Forever
- Divalicious
- Award
- Intentions
- Sweet Valentine
- Newest Blinkie and Banner set!
- Twisted
- Beauty Within
- Be Mine
- Another New Blinkie
- Newest Blinkie
- Blinkie I Made 1/16/09
- Blinkies Made by Me!
- My 1st QP
- $1.00 Sale @ Scrappin'Bratz
- Sunflowers Galore
- Signs Of Love
- Cherished
- New Blinkie I Made 1/14/09
- Touble
- Gothic Princess
- Happy 2009
- Paradise
- Sale! Sale! Sale!
- Material Girl
- Geisha
- Lavender Crush
- Grand Opening to Country Hollow Scraps
- Goth Bytch
- Pink Laces
- Naughty Minx
- Scrappin' Bratz CT Call
- Bratz
- Cowgirl Wanted
- Envious
- Devoted
- Fairy-licious
- With Love
- Anchor'd
- Love Me
- 2008 (13)
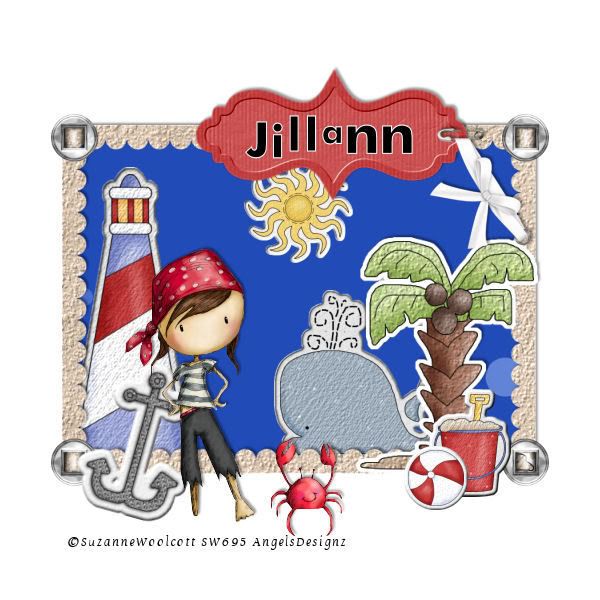
Anchor'd
All of my tutorials require a working knowledge of PSP!
This tutorial was written by me on January 1,2009. It is of my own ideas and creation! Any other tutorials found to be similar is coincidental.
This tutorial was written by me on January 1,2009. It is of my own ideas and creation! Any other tutorials found to be similar is coincidental.
Supplies Needed
Scrapkit of Choice
I'm using a Wonderful kit called Anchors Away,made by Jillann @ Jillann's Creations. You can purchase this kit here
Tube of Choice
I'm using the Wonderful work of Suzanne Woolcott.You must have a license to use her work! You can purchase that here
Let's Begin
Open New Image 600x600
Flood fill white
Find the frame8
Copy and paste as new layer
Resize 80%
Find your tube of choice
Copy and paste as new layer
Place like mine
Add a dropshadow of choice
Pick a paper of choice
Copy and paste as new layer
Resize if needed
Grab your magic wand tool
Click on the inside of your frame
Selections,Modify,Expand by 5
Selections,Invert
Highlight your paper layer
Hit delete ony our keyboard
Selections,Select none
Move paper below frame layer
Copy and paste the lighthouse
Resize 70%
Place below the frame but above the paper layer(See mine for reference)
Copy and paste the anchor
Resize 60%
Place on the left side of the frame
Image,Rotate,Free Rotate 15.50,Right
Copy and paste the whale
Resize by 60%
Place behind frame like mine
Copy and paste a journal tag of choice
Resize 70%
Place on top middle of the frame
Add a light dropshadow of choice
Copy and paste the BowWhite
Resize 45%
Place like mine
Add a light dropshadow of choice
Find the Ribbon Slides
Copy and paste the silver one as new layer
Resize 50%
Place on top left corner of frame
Duplicate this layer 3 times
Place on each corner of frame
Add your Name and CopyRight Info!
Copy and paste the Bucket
Resize 50%
Copy and paste the beachball
Resize 40%
Place like mine or to your liking
Copy and paste the sun
Resize 40%
Place below frame layer but above paper layer
All Done, Hope you enjoyed my tutorial!
Labels:
MY TUTORIALS
Subscribe to:
Post Comments (Atom)
Blog Archive
-
▼
2009
(333)
-
▼
January
(75)
- Flower Garden
- Valentine Sweetheart
- Orange Crush
- Letters From Iraq
- Someone I ♥ has Lupus
- Hope
- Lil Birdie's
- Another New Blinkie 1/29/09
- Newest Blinkie 1/29/09
- WildLife-Friends
- Jeans Kinda Girl
- Love You-Valentine
- Passion
- Goth Love
- Kiss This
- Girlz Rule
- Pirate Chick
- Addicted
- Pot of Gold
- Country Hollow Scraps Store
- British Pride
- Love Notes
- Sexy Valentine
- S♥W♥A♥K
- Newest Blinkie Made 1/23/09
- Bright & Beautiful
- Newest Blinkies Made Today! 1/22/09
- CT Call!
- Farrah's having a SALE!!!!
- Newest Blinkie I Made 1/21/09
- Envy Me
- Arizona Cardinals
- el-e-gance
- Go Team
- Guardian Angel
- Always & Forever
- Divalicious
- Award
- Intentions
- Sweet Valentine
- Newest Blinkie and Banner set!
- Twisted
- Beauty Within
- Be Mine
- Another New Blinkie
- Newest Blinkie
- Blinkie I Made 1/16/09
- Blinkies Made by Me!
- My 1st QP
- $1.00 Sale @ Scrappin'Bratz
- Sunflowers Galore
- Signs Of Love
- Cherished
- New Blinkie I Made 1/14/09
- Touble
- Gothic Princess
- Happy 2009
- Paradise
- Sale! Sale! Sale!
- Material Girl
- Geisha
- Lavender Crush
- Grand Opening to Country Hollow Scraps
- Goth Bytch
- Pink Laces
- Naughty Minx
- Scrappin' Bratz CT Call
- Bratz
- Cowgirl Wanted
- Envious
- Devoted
- Fairy-licious
- With Love
- Anchor'd
- Love Me
-
▼
January
(75)










0 comments:
Post a Comment